The Foundation- What Happens Before Any Editing Begins
Professional ghost mannequin images are created through a structured process, not shortcuts.
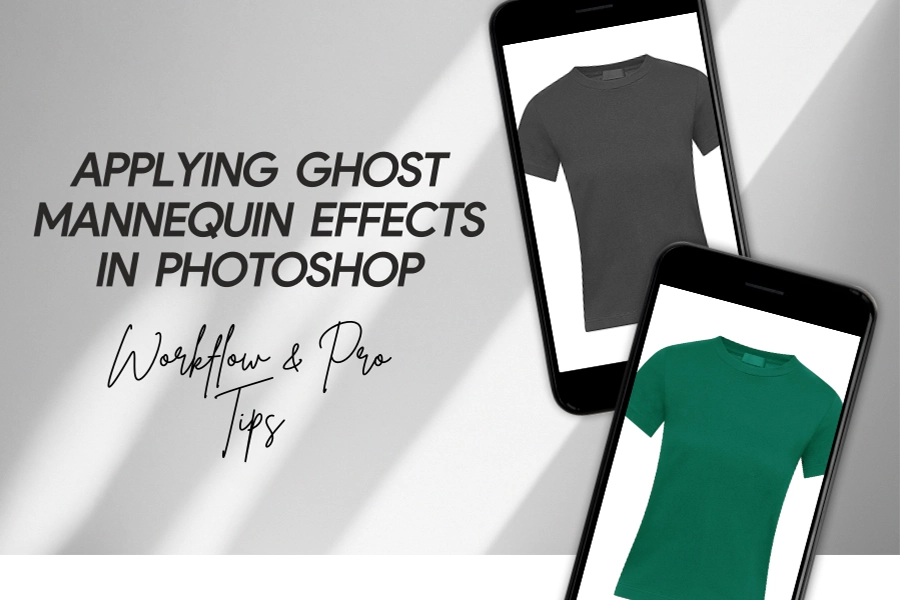
This guide explains how professional ghost mannequin images are created for ecommerce success, from photography and preparation to reconstruction, consistency, and final quality control.
Professional ghost mannequin images are not created in Photoshop first.
They are created before editing even starts, through proper planning, correct photography, and disciplined preparation. This foundation determines whether the final image will look realistic and trustworthy or fake and edited.
Most ecommerce brands focus only on editing.
Professionals focus on the entire workflow.
Why the “Before Editing” Stage Matters So Much
Ghost mannequin editing is not magic.
If the source images are wrong:
Neck joints look fake
Garment shapes distort
Fabric texture disappears
Editors are forced to guess
No amount of editing skill can fully fix poor preparation.
That’s why professional ghost mannequin images always start with correct photography and review, not shortcuts.
Step 1: Proper Ghost Mannequin Photography (Non-Negotiable)
Every professional ghost mannequin image begins with intentional photography.
What Professional Photography Includes
Mannequin positioned straight and centered
Garment aligned naturally (no twisting or pulling)
Even lighting with minimal harsh shadows
Camera positioned at chest height (no wide-angle distortion)
Clean, uncluttered background
Most importantly:
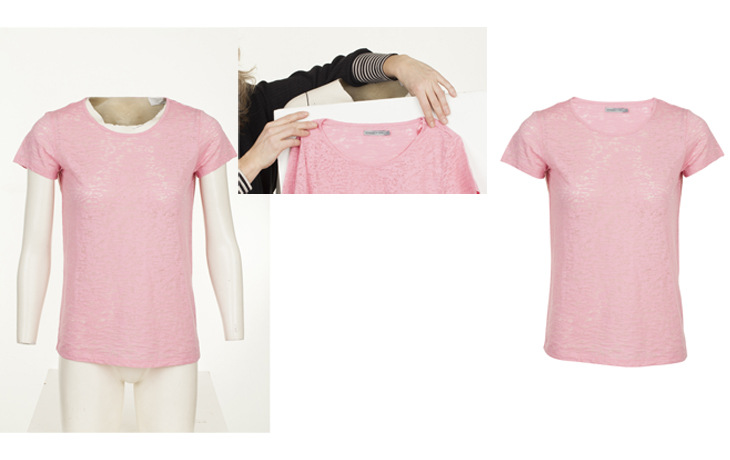
👉 Inner neck / back collar images must be photographed separately
This inner shot is what allows editors to reconstruct a realistic neckline later. Without it, neck joints will always look artificial.


Why Inner Neck Images Are Critical
Many brands skip inner neck shots to save time.
That mistake leads to:
Flat, hollow necklines
Fake-looking collar depth
Visible editing seams
Professional ghost mannequin images require real fabric data to rebuild what the mannequin hides. Inner neck shots provide that data.
No inner shot = guesswork.
Step 2: Image Review & Selection (Often Ignored)
Before any editing begins, professionals review every image.
What Editors Check at This Stage
Are all required angles available?
Is lighting consistent across products?
Are sleeves, hems, and collars fully visible?
Is the garment photographed symmetrically?
Are there creases caused by poor styling?
Why This Review Matters
This step prevents:
Neck joint mismatches
Inconsistent product scale
Excessive retouching later
Professional editing is about reducing correction, not fixing avoidable mistakes.
Step 3: File Organization & Matching (For Accuracy at Scale)
Professional ghost mannequin editing treats images as sets, not singles.
Editors:
Group front images with correct inner-neck shots
Separate colors and variants
Label files clearly before editing
Why this matters:
Prevents wrong neck joints being used
Maintains consistency across SKUs
Saves time and avoids rework
At scale, poor organization causes catalog-wide errors.
Why Amateur Workflows Fail at This Stage
Most low-cost or DIY workflows:
Skip inner neck photography
Start editing immediately
Ignore preparation review
Mix files randomly
This results in:
Fake-looking ghost mannequin images
Inconsistent catalogs
Lower buyer trust
Professional results are not about tools — they’re about discipline.
What Brands Should Understand at This Point
If you want professional ghost mannequin images:
Photography must be planned for editing
Inner neck shots are mandatory
Review happens before Photoshop
Editing is reconstruction, not removal
This foundation determines everything that follows.
The Core Editing Process — How Professionals Rebuild Apparel Images
Once photography and preparation are done correctly, the real work begins.
This is the stage where ghost mannequin editing becomes image reconstruction, not simple background removal. The quality of this process determines whether an image looks photographed and trustworthy or edited and artificial.
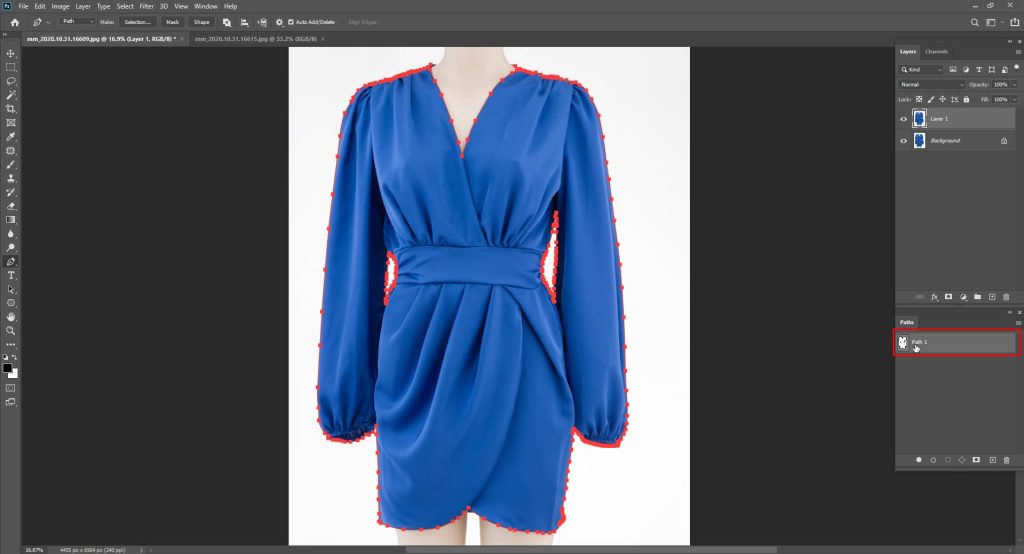
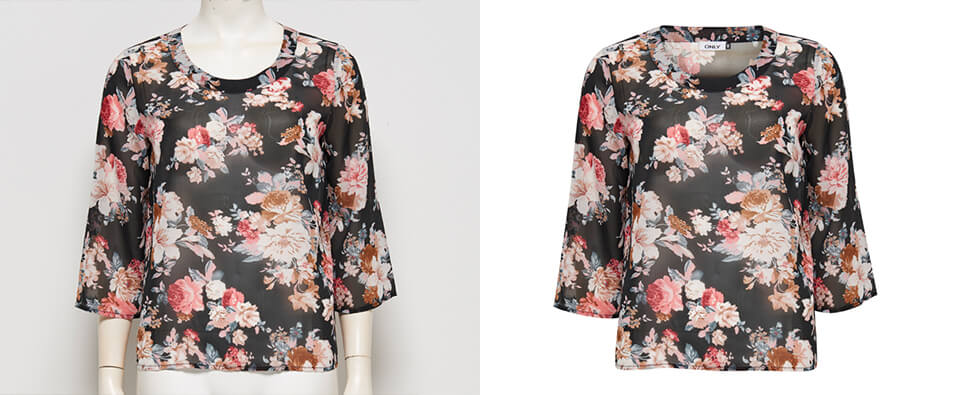
Step 4: Precise Mannequin Removal (Manual, Not One-Click)
Professional ghost mannequin editing never relies fully on automatic tools.
What Professionals Actually Do
Manually mask the garment at pixel level
Clean color reflections caused by the mannequin
Protect complex fabric edges (collars, sleeves, hems)
Auto tools may speed things up, but they:
Miss fine edges
Damage fabric texture
Create halos and rough outlines
Professional results require manual precision.
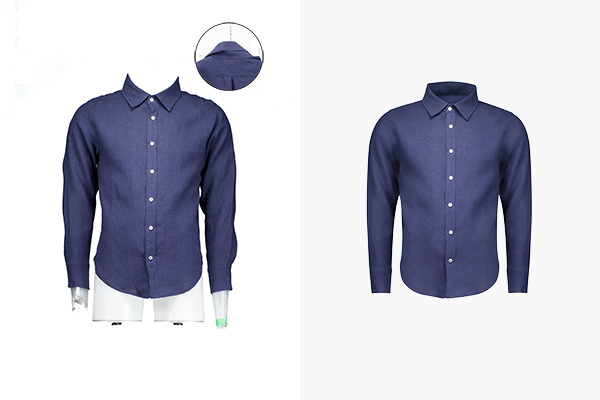
Step 5: Neck Joint Reconstruction (The Most Important Step)
This step defines whether an image looks real or fake.
Ghost mannequin editing is not complete when the mannequin disappears — it’s complete when the missing garment areas are rebuilt naturally.
How Professionals Create Realistic Neck Joints
Extract the inner neck image
Align fabric grain and stitching
Match lighting direction and shadow depth
Blend seamlessly into the outer garment
The goal is simple: The neckline should look like it was photographed on a real body.
Why Neck Joints Fail in Cheap Editing
Neck joints fail when:
Inner neck images are missing
Editors guess the fabric shape
Auto blending is used without manual correction
This results in:
Flat, hollow necklines
Visible seams
Unnatural depth
Buyers notice this instantly — even subconsciously.
Step 6: Garment Shape & Structure Preservation
Once the mannequin is removed, garments often lose structure.
Professionals carefully restore natural shape, not idealized shape.
What Professionals Adjust
Shoulder alignment
Sleeve balance
Natural drape and fall
What Professionals Never Do
Slim the garment
Stretch proportions
“Improve” fit unrealistically
In ecommerce, accuracy matters more than style.
Misrepresenting fit leads to returns and complaints.
Step 7: Fabric Texture & Detail Protection
Fabric texture is one of the strongest buying signals in apparel ecommerce.
Professional editors ensure:
Fabric grain remains visible
Stitching stays sharp
Wrinkles look natural, not airbrushed
Material thickness feels realistic
Over-smoothing may look “clean,” but it kills trust.
Step 8: Background Perfection & Edge Refinement
Professional ghost mannequin images require flawless backgrounds, especially for ecommerce platforms.
What Professionals Do
Create a pure white or uniform background
Refine edges at pixel level
Remove halos and rough outlines
Ensure no background bleed into fabric
Images are checked at:
Full resolution
Zoomed-in view
Thumbnail and mobile size
Small edge mistakes that seem invisible on desktop become obvious on mobile.
Step 9: Lighting Balance & Visual Realism
After reconstruction, professionals rebalance the image so it still feels photographed, not edited.
What Gets Checked
Even brightness across the garment
Natural shadow behavior
No floating appearance
No over-contrast or flat exposure
The goal is realism — not dramatic styling.
Step 10: Catalog-Level Consistency (Where Professionals Win)
Single images don’t sell brands — consistent sets do.
Professional ghost mannequin editing includes a catalog-wide review.
What Editors Check Side-by-Side
Neck depth consistency
Garment scale and positioning
Angle and orientation
Lighting and color tone
Consistency builds:
Brand trust
Professional storefront appearance
Higher conversion rates

Step 11: Platform Readiness & Validation
Before delivery, images are reviewed based on where they will be used.
Marketplace-Ready Images
Strict accuracy
No shape exaggeration
Honest fit representation
Brand Store Images
Visual clarity
Consistent presentation
Trust-first styling
This reduces:
Listing rejections
Buyer confusion
Product returns
Step 12: Final Quality Control (The Safety Net)
Professional services never deliver without a final QC pass.
Final QC Includes
Neck joint realism check
Shape accuracy confirmation
Texture preservation review
Edge and background inspection
Consistency across SKUs
This final step prevents silent performance loss after launch.
Why This Entire Process Converts Better
Professional ghost mannequin images outperform cheap edits because they:
Show accurate fit
Preserve real texture
Maintain catalog consistency
Build buyer trust
Reduce returns
Customers don’t buy perfection — they buy confidence.
What Happens When Steps Are Skipped
When services skip parts of this process:
Neck joints look fake
Shapes get distorted
Catalogs look inconsistent
Trust drops
Returns increase
Speed without structure always costs more in the long run.
What Ecommerce Brands Should Take Away (2026)
Professional ghost mannequin images are created through:
Planned photography
Careful reconstruction
Shape preservation
Texture protection
Consistency enforcement
Quality control
Understanding this process helps brands:
Evaluate editing quality
Choose better partners
Scale catalogs safely
Need Professional Ghost Mannequin Editing?
At Clipping Area, our ghost mannequin editing follows every step covered in this guide:
Manual mannequin removal
Natural neck joint reconstruction
Shape-accurate editing
Fabric texture preservation
Catalog-level consistency checks
If you’re a clothing brand looking for clean, natural ghost mannequin edits at scale, Clipping Area offers professional ghost mannequin photo editing with fast turnaround and consistent quality.
👉 Start with a free ghost mannequin editing trial
See the difference before committing.
FAQ 1: Are professional ghost mannequin images really better than auto-editing tools?
Answer:
Yes. Auto tools can remove backgrounds, but they cannot reconstruct realistic neck joints, preserve garment shape, or maintain fabric texture. Professional ghost mannequin images follow a manual, apparel-specific process that produces more accurate and trustworthy results for ecommerce.
❓ FAQ 2: Why are inner neck images necessary for ghost mannequin editing?
Answer:
Inner neck images provide real fabric data that editors use to rebuild missing garment areas. Without them, neck joints look flat, hollow, or artificial, which reduces image realism and buyer trust.
❓ FAQ 3: Can poor photography be fixed with professional ghost mannequin editing?
Answer:
Only partially. Professional editing improves good photography, but it cannot fully fix poor lighting, missing angles, or incorrect garment positioning. High-quality ghost mannequin images always start with proper photography and preparation.
❓ FAQ 4: How long does it take to create professional ghost mannequin images?
Answer:
Turnaround time depends on image volume, apparel complexity, and consistency requirements. Professional services prioritize accuracy and quality control over speed to ensure ecommerce-ready results.
❓ FAQ 5: Do professional ghost mannequin images reduce product returns?
Answer:
Yes. Accurate shape representation, preserved fabric texture, and realistic neck joints help set correct buyer expectations, which reduces “not as described” returns and customer complaints.
❓ FAQ 6: Is ghost mannequin editing suitable for all apparel types?
Answer:
Yes, but complexity varies. Simple garments require less reconstruction, while jackets, hoodies, and layered apparel require more advanced editing to maintain structure and realism.