A Practical, Seller-First Guide to Get Your Clothing Listings Approved Faster
Selling apparel on Amazon in 2026 can be extremely frustrating when your product images get rejected—especially when Amazon doesn’t clearly explain why.
Many sellers assume image rejection means:
They need a new photoshoot
Their product is banned
Amazon made a mistake
In reality, most rejected Amazon apparel images can be fixed—often without re-shooting, re-listing, or waiting weeks.
This step-by-step guide explains how to fix rejected Amazon apparel images in 2026, why Amazon rejects clothing images more often than other categories, and how to correct the most common problems the right way.
This article is written for:
Apparel brand owners
Amazon FBA sellers
Clothing wholesalers
Fashion ecommerce managers
Why Amazon Rejects Apparel Images More Than Other Categories
Before fixing anything, you must understand why apparel images are treated differently.
Unlike electronics or home goods, clothing has:
Fit expectations
Shape perception
Fabric texture
Body-related assumptions
Amazon rejects apparel images more aggressively because:
Clothing has higher return rates
Customers often complain “not as described”
Images strongly influence size and fit expectations
So Amazon enforces stricter visual accuracy rules for apparel.
If your images misrepresent shape—even slightly—Amazon considers it misleading.
The Hidden Truth About Amazon Image Rejection (2026)
Here’s something most sellers don’t realize: Amazon image rejection is mostly automated.
In 2026, Amazon uses:
Automated background detection
Shape analysis
Edge & artifact detection
Color accuracy checks
This means:
Amazon may reject an image even if it looks fine to humans
Minor technical flaws can trigger rejection
Sellers often receive no clear explanation
That’s why guessing doesn’t work.
You need a systematic fixing process.
Step 1: Identify the REAL Reason Your Amazon Apparel Image Was Rejected
Amazon often gives vague messages like:
“Image does not meet requirements”
“Main image violation”
“Non-compliant image”
To fix rejected Amazon apparel images, you must diagnose the issue yourself.
The 5 Most Common Apparel Image Rejection Categories
Nearly every rejection falls into one of these:
1️⃣ Background & edge issues
2️⃣ Ghost mannequin or mannequin visibility
3️⃣ Incorrect framing / size
4️⃣ Shape or proportion manipulation
5️⃣ Accuracy & misleading presentation
We’ll break each down step by step.
Step 2: Fix Background & Edge Problems (Most Common Fix)
Why This Causes Rejection
Amazon requires the main apparel image background to be pure white:
RGB: 255, 255, 255
No shadows touching edges
No gradients or texture
Even slightly gray or off-white backgrounds can trigger rejection.
Common Seller Mistakes
Auto background removal tools
Low-quality clipping paths
Shadows bleeding into the border
Gray halos around sleeves or collars
How to Fix It Properly
Manually clean edges (not auto tools)
Remove halos around fabric fibers
Keep natural shadows inside the garment
Ensure edges blend smoothly into white
👉 This alone fixes a large percentage of rejected Amazon apparel images.
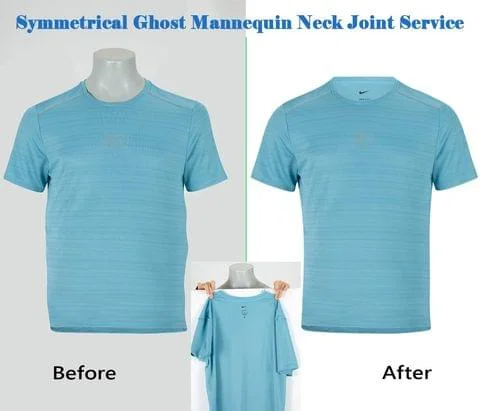
Step 3: Fix Ghost Mannequin & Invisible Mannequin Issues
This step is critical for clothing sellers.
Why Amazon Rejects Ghost Mannequin Images
Ghost mannequin editing is allowed—but only when:
The mannequin is 100% invisible
The garment looks realistic
The shape is accurate
Amazon rejects images when:
Mannequin edges are visible
Neck joints look fake
Garments appear “floating”
Clothing looks reshaped or slimmed
What Amazon Expects to See
Natural neckline depth
Realistic inner collar
Consistent fabric flow
No visible mannequin parts
If your ghost mannequin image looks “edited,” Amazon may reject it.
Step 4: Fix Incorrect Image Size & Framing
Another silent rejection trigger is improper framing.
Amazon Apparel Image Requirements
Product must fill at least 85% of the image
The garment must be centered
No excessive empty space
No cropping off sleeves or hems
Common Problems
Too much white space
Garment too small in frame
Over-cropping
Inconsistent framing across variations
How to Fix It
Re-crop images professionally
Keep consistent margins
Ensure each variation image matches style & size
Correct framing improves:
Approval rate
Click-through rate
Conversion
Step 5: Fix Shape & Proportion Manipulation (Very Important)
This is where many sellers unknowingly violate Amazon rules.
What Counts as Shape Manipulation
Slimming waistlines
Sharpening shoulders
Lengthening garments
Removing natural wrinkles
Even subtle adjustments can be considered misleading.
Why Amazon Rejects These Images
Amazon wants: “What the customer receives must match what the image shows.”
If the image exaggerates fit, Amazon may reject or suppress it.
How to Fix It
Restore original garment proportions
Keep natural folds
Avoid “beautifying” edits
Match visual size to real measurements
Accuracy > attractiveness on Amazon.
Step 6: Check Color Accuracy & Fabric Reality
Color issues are another common rejection trigger.
Why Color Matters
Customers select variations based on color
Color mismatch causes complaints & returns
Amazon cross-checks images with variation data
Common Problems
Over-saturated colors
Incorrect white balance
Same image reused for multiple colors
How to Fix It
Correct color using reference samples
Ensure each color variation has its own image
Avoid heavy filters or color grading
Quick Self-Audit: Can Your Image Be Fixed Without Re-Shooting?
Answer YES or NO:
Is the background almost white but not pure white?
Is the mannequin barely visible?
Does the neck joint look unnatural?
Does the garment look slimmer than real life?
Is the framing inconsistent?
If you answered YES to any, your image is likely fixable through professional editing.
Why Guessing Doesn’t Work (And Costs You Sales)
Many sellers:
Re-upload the same image
Make random changes
Wait days or weeks
This causes:
Listing downtime
Lost ranking momentum
Missed sales opportunities
A structured fix process is faster and safer.
The Correct Order to Fix Rejected Amazon Apparel Images (Very Important)
Many sellers fail because they fix issues randomly.
The correct order is:
1️⃣ Background & edges
2️⃣ Mannequin & ghost mannequin issues
3️⃣ Framing & size
4️⃣ Shape & proportion accuracy
5️⃣ Color & variation consistency
Skipping or changing the order often leads to repeat rejection.
Step 7: Fix Background & Edge Issues (Detailed Workflow)
This step alone resolves a huge percentage of apparel image rejections on Amazon.
What Amazon’s System Detects
Non-pure white background
Gray or dark pixels near edges
Rough clipping around fabric fibers
Shadows touching image borders
Professional Fix Process
Manually refine edges (especially sleeves, collars, hems)
Remove gray halos pixel by pixel
Keep soft natural shadows inside the garment only
Validate background as true white (RGB 255,255,255)
⚠️ Auto background removal tools almost always leave artifacts.
Step 8: Fix Ghost Mannequin Problems the Amazon-Safe Way
Ghost mannequin editing is where most apparel sellers fail.
Amazon-Safe Ghost Mannequin Requirements
Mannequin must be 100% invisible
Neck joint must look naturally photographed
Inner collar detail should be realistic
Garment depth should feel natural, not flat
Common Ghost Mannequin Fixes
Rebuild neck joint using original fabric texture
Align collar stitching correctly
Restore realistic shoulder width
Add subtle depth without fake shadows
If the image looks “edited,” Amazon may reject it.
If it looks “photographed,” Amazon usually approves it.
Step 9: Correct Framing & Cropping Issues
Amazon requires the apparel item to fill at least 85% of the image frame.
Rejection Triggers
Too much empty white space
Garment looks small at thumbnail size
Sleeves or hems cropped off
Inconsistent framing across variations
How to Fix It Properly
Re-crop to emphasize the garment
Keep margins consistent across all products
Ensure each color variation follows the same framing style
Correct framing improves:
Approval rate
Click-through rate
Visual consistency
Step 10: Restore Accurate Shape & Proportions
This step is critical — and often misunderstood.
What Amazon Considers Misleading
Slimming waistlines
Straightening natural curves
Removing fabric folds
Making clothing look more fitted than reality
Even “small beauty edits” can violate Amazon policy.
How to Fix Shape Issues
Compare edited image with original photo
Restore natural wrinkles and folds
Match garment width and length to reality
Avoid over-smoothing fabric texture
On Amazon, accuracy beats aesthetics.
Step 11: Fix Color & Variation Mismatch Issues
Color mismatch is a silent but deadly rejection trigger.
Why Amazon Is Strict About Color
Color is a variation selector
Customers complain if color looks different
Amazon cross-checks image vs variation data
Common Problems
Same image reused for multiple colors
Over-saturated edits
Incorrect white balance
How to Fix It
Edit each color variation separately
Use reference samples if available
Keep color correction realistic and consistent
Never reuse one image for multiple color variations.
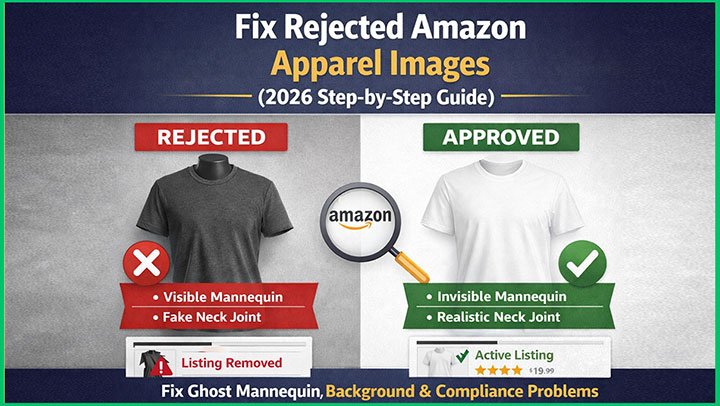
Visual Difference: Rejected vs Fixed Amazon Apparel Images

Notice the differences:
Clean edges
Natural neckline
Accurate shape
Correct framing
These small details decide approval vs rejection.
DIY Fix vs Professional Fix (Honest Comparison)
Many sellers ask if they should fix images themselves.
| Factor | DIY Fix | Professional Fix |
|---|---|---|
| Amazon compliance | ❌ Inconsistent | ✅ Reliable |
| Ghost mannequin realism | ❌ Often fake | ✅ Natural |
| Background accuracy | ❌ Risky | ✅ Perfect |
| Time spent | High | Low |
| Rejection risk | High | Very low |
| Long-term scalability | Poor | Excellent |
DIY may seem cheaper, but lost sales cost more.
Case Example: Rejected → Approved Amazon Apparel Listing
Product: Women’s summer dress
Issue:
Image rejected twice
No clear reason given
Problems Found:
Slight mannequin shadow at neckline
Dress shape subtly slimmed
Background RGB slightly off-white
Fix Applied:
Full mannequin removal
Neck joint reconstruction
Shape restored to original proportions
Background corrected to pure white
Result:
Image approved within 24 hours
Listing restored
Improved click-through and engagement
This is a very common scenario.
Why Re-Uploading Without Fixing Fails
Many sellers try:
Re-uploading the same image
Making random changes
Waiting for a different result
This usually causes:
Repeat rejection
Listing downtime
Ranking loss
Amazon’s system remembers patterns.
You must fix the root cause.
Amazon Apparel Image Fix Checklist (2026) — Save This
Use this checklist every time before uploading images to Amazon.
Pages with clear checklists are more likely to win featured snippets.
✅ Main Image Compliance Checklist
☐ Background is pure white (RGB 255,255,255)
☐ Garment fills 85%+ of the frame
☐ No text, logos, or badges
☐ No visible mannequin or model
☐ Clean edges (no gray halos)
☐ Accurate color representation
✅ Ghost Mannequin Quality Checklist
☐ Mannequin completely invisible
☐ Neck joint looks natural and realistic
☐ Inner collar detail present
☐ No floating or paper-flat appearance
☐ True garment proportions (no slimming)
✅ Variation & Accuracy Checklist
☐ Separate image for each color variation
☐ No reused images across variations
☐ Fabric texture matches real product
☐ Image matches product title & description
If all boxes are checked, rejection risk is extremely low.
When You MUST Re-Shoot Apparel Images (Rare but Important)
Most rejected images do NOT require re-shooting.
However, re-shooting becomes unavoidable when:
❌ Original images are extremely low resolution
❌ Product was photographed incorrectly (wrong angle, wrinkled badly)
❌ Garment shape was never captured properly
❌ Severe lighting distortion hides fabric texture
If the original photo is fundamentally flawed, editing can’t fully fix it.
Rule of thumb:
If the product looks wrong before editing, re-shoot.
If it looks mostly right after editing, fix it digitally.
How to Prevent Amazon Apparel Image Rejections in the Future
Fixing is good. Preventing is better.
1️⃣ Standardize Your Apparel Image Workflow
Use the same mannequin type
Maintain consistent lighting
Keep camera distance consistent
Shoot front, back, and inner neck shots
Consistency reduces editing errors and approval issues.
2️⃣ Stop Using Auto Tools for Amazon Images
Auto tools often:
Leave edge artifacts
Create fake depth
Distort garment shape
Amazon detects these mistakes easily.
Professional, manual editing is safer.
3️⃣ Treat Amazon Images as Compliance Assets
Amazon images are not:
Instagram content
Branding experiments
Creative playgrounds
They are compliance + conversion tools.
Accuracy always beats creativity on Amazon.
How High-Quality Apparel Images Improve Amazon Sales (Beyond Approval)
Fixing rejections is only step one.
Optimized images also improve performance metrics Amazon cares about.
High-Quality Apparel Images Help:
Increase click-through rate (CTR)
Improve conversion rate
Reduce returns
Lower negative reviews
Stabilize listing ranking
Amazon favors listings that: Sell well and keep customers satisfied.
Ghost Mannequin Images vs Flat Lay for Amazon (Quick Insight)
While both are allowed:
Flat lay = safer, but less clarity for fit
Ghost mannequin = better fit perception, when compliant
For most apparel categories, ghost mannequin images convert better when edited professionally and accurately.
Common Seller Mistakes That Cause Repeat Rejection
Avoid these patterns:
Re-uploading the same image without fixing
Making random edits without diagnosis
Over-editing to “make it look better”
Ignoring shape accuracy
Rushing uploads without checking
Amazon’s system remembers repeated violations.
Frequently Asked Questions (Seller-Level Answers)
Is ghost mannequin editing allowed on Amazon for apparel products?
Yes. Amazon allows ghost mannequin (invisible mannequin) images for apparel as long as the mannequin is completely invisible and the garment looks realistic. Amazon rejects ghost mannequin images only when they show visible mannequin parts, fake-looking neck joints, or altered garment shapes.
Why does Amazon reject apparel images without giving a clear reason?
Amazon uses automated image review systems, not manual reviewers in most cases. These systems detect technical and visual issues such as non-white backgrounds, edge artifacts, unrealistic shapes, or mannequin visibility. Because the process is automated, sellers often receive generic rejection messages instead of detailed explanations.
Can fixing rejected images restore a suppressed Amazon listing?
Yes. In many cases, fixing and re-uploading compliant images restores suppressed listings. Once the main image meets Amazon’s requirements, visibility often returns within hours or up to 24 hours. However, repeated rejections can delay recovery, which is why fixing the root issue is critical.
Do I need a new photoshoot to fix rejected Amazon apparel images?
Usually no. Most rejected Amazon apparel images can be fixed through professional image editing, including background correction, ghost mannequin fixes, shape restoration, and color accuracy adjustments. A new photoshoot is only necessary when the original image quality is extremely poor or the garment was photographed incorrectly.
How long does Amazon take to approve fixed apparel images?
After uploading corrected images, Amazon typically approves them within a few hours, though in some cases it may take up to 24 hours. Approval speed depends on image quality and whether the fix fully resolves the original rejection issue.
Can one rejected image affect my entire Amazon product listing?
Yes. If the main image violates Amazon rules, the entire listing can be suppressed, even if secondary images are compliant. That’s why fixing the main image first is the most important step when dealing with image rejections.
Are ghost mannequin images better than flat lay images for Amazon apparel?
Ghost mannequin images often convert better because they show garment shape and fit more clearly. However, they must be edited correctly. Poor ghost mannequin editing gets rejected more often than flat lay images. When done professionally and accurately, ghost mannequin images are both Amazon-compliant and conversion-friendly.
Does Amazon penalize sellers for repeated image rejections?
Amazon does not publicly confirm penalties, but repeated image rejections can lead to longer approval times, listing suppression, and lost ranking momentum. Fixing issues properly instead of repeatedly re-uploading the same image helps avoid long-term problems.
Should I fix Amazon apparel images myself or hire professionals?
DIY fixes often fail because Amazon image compliance is technical, not cosmetic. Professional editing reduces rejection risk, saves time, and ensures images meet Amazon’s strict requirements. For sellers serious about scaling, professional fixing is usually the safer and more cost-effective option.
Can optimized apparel images improve Amazon sales, not just approval?
Yes. High-quality, compliant apparel images:
Increase click-through rate (CTR)
Improve conversion rate
Reduce returns
Lower negative reviews
Amazon’s algorithm favors listings that sell well and satisfy customers, so image optimization directly impacts ranking over time.
What is the biggest mistake apparel sellers make with Amazon images?
The biggest mistake is over-editing—slimming garments, removing natural wrinkles, or making clothing look better than reality. Amazon prioritizes accuracy over beauty, and misleading images are one of the top causes of rejection and returns.
Turning Image Fixes Into a Long-Term Advantage
Successful Amazon apparel sellers don’t just “fix problems.”
They build systems.
They:
Standardize photography
Use professional editing
Follow checklists
Prevent issues before they happen
That’s how listings scale without constant rejections.
Fix Rejected Amazon Apparel Images the Right Way
At Clipping Area, we help apparel sellers:
Fix rejected Amazon images
Correct ghost mannequin issues
Restore accurate shape and color
Create fully compliant, conversion-focused apparel images
👉 Start with a free image fixing trial
See the quality and compliance before you invest.