A great product photo can still look cheap if the edges are messy or the background is distracting. That is where a clipping path comes in. A clipping path is a hand-drawn outline that separates the main subject of a photo from everything around it. Once the subject is cut out cleanly, you can change the background, fix colors, add shadows, or place it in a new design without damage. In short, using a clipping path for better image manipulation gives you full control over every part of an image.
In this guide, you will learn what a clipping path is, how it works, the different types, where it is used, and how to pick the right editing partner. Whether you run an online store, shoot fashion, or sell homes, this is the one resource you need.
What Is a Clipping Path? (Quick Answer)
A clipping path is a closed vector outline drawn around an object in a photo, usually with the Pen Tool in Adobe Photoshop. Anything inside the path stays visible. Anything outside the path is hidden or removed. Editors use it to isolate products, remove backgrounds, and edit one part of an image without touching the rest.
Think of it like cutting a picture out of a magazine with very sharp scissors. The difference is that a clipping path is digital, precise down to the pixel, and fully editable later.
Key facts at a glance:
- Tool used: Pen Tool in Photoshop (also Illustrator and similar apps)
- Type of outline: Vector path made of anchor points and Bezier curves
- Best for: Objects with clear, hard edges like shoes, bags, bottles, gadgets, and furniture
- Main result: A clean cutout ready for a white, transparent, or custom background
- Common file formats: PSD, TIFF, EPS, JPEG, and PNG (for transparent backgrounds)
How Does a Clipping Path Work?
A clipping path works by tracing the edge of an object point by point. The editor zooms in on the photo and places small markers called anchor points along the outline. Between those points, the Pen Tool creates smooth lines or curves. When the path closes, it forms a shape that matches the object exactly.
Because the path is vector based, it does not lose quality when you resize it. You can save it inside the file, turn it into a selection, or use it as a layer mask. That flexibility is why designers and print shops have trusted this method for decades.
Here is the simple process in plain terms:
- Trace: The editor draws the outline around the subject with the Pen Tool.
- Refine: Curves are adjusted so the path hugs every edge.
- Close: The path is joined at the start point to form a full shape.
- Apply: The path becomes a selection or mask, and the background is removed or replaced.
- Save: The file is exported with the path kept for future edits.
Why a Clipping Path Leads to Better Image Manipulation
Image manipulation means changing a photo to improve it or to create something new. Without a clean cutout, most edits look fake. A precise clipping path solves that problem at the root. Here is why it matters so much.
1. It Gives You Full Control Over the Subject
Once the subject is isolated, you can edit it on its own. You can brighten a dull product, change its color, or sharpen details while the background stays untouched. This kind of selective editing is the base of almost all professional retouching.
2. It Creates Sharp, Clean Edges
Automatic selection tools often leave rough or blurry borders. A hand-drawn path follows the true edge of the object. The result is a crisp outline that looks natural, even when the image is printed large or zoomed in on a product page.
3. It Makes Background Changes Easy
Need a pure white background for Amazon? A transparent PNG for your website? A lifestyle scene for an ad? With a saved clipping path, you can swap the background in seconds, as many times as you like.
4. It Keeps Your Brand Consistent
Shoppers trust stores that look tidy and uniform. When every product sits on the same background, at the same size, with the same clean edges, your catalog looks professional. Clipping paths make that consistency possible across hundreds or thousands of images.
5. It Works for Print and Digital
Vector paths scale without losing quality. That makes them ideal for brochures, catalogs, packaging, billboards, and web pages alike. Many print workflows still ask for files with an embedded clipping path for this reason.
6. It Opens the Door to Advanced Edits
Shadow creation, reflection effects, ghost mannequin work, product compositing, and color variants all start with a clean cutout. A good clipping path is the first step before almost every advanced edit.
7. It Saves Time in the Long Run
A path saved inside the file can be reused. If you need a new background next season, the editor does not have to start again. That makes future edits faster and cheaper.
Clipping Path vs Image Masking vs Background Removal
People often mix up these terms. They are related, but each one fits a different job.
| Technique | How It Works | Best For | Not Ideal For |
|---|---|---|---|
| Clipping path | Hand-drawn vector outline with the Pen Tool | Hard-edged items like shoes, electronics, bottles, furniture | Hair, fur, smoke, soft fabric edges |
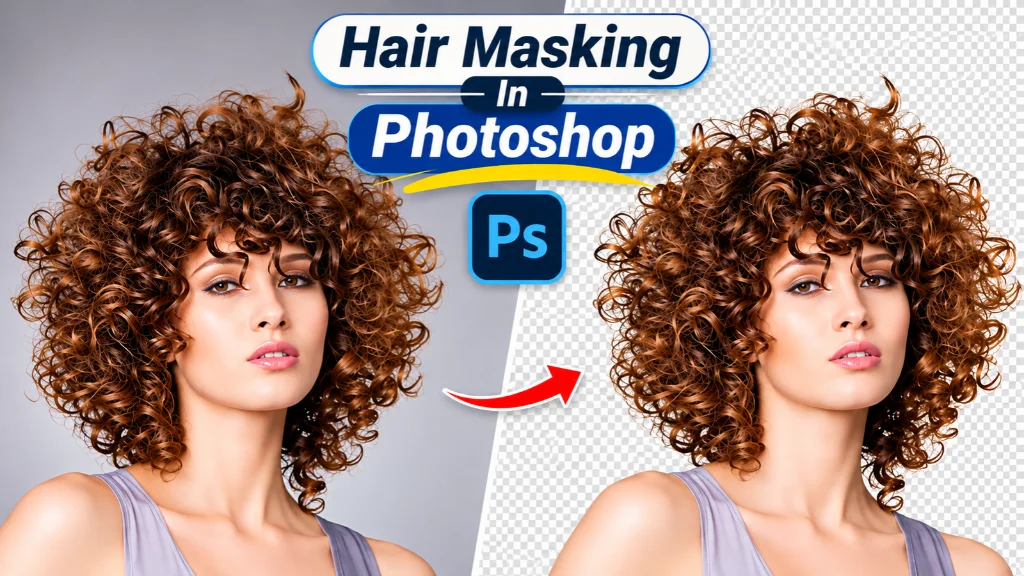
| Image masking | Pixel-based mask using channels, brushes, or refine edge tools | Hair, fur, feathers, lace, transparent objects | Simple products where a path is faster |
| Background removal | The end goal of removing the backdrop, done with a path, a mask, or both | Any photo that needs a new or clean background | It is a result, not a single method |
| AI auto cutout | Software guesses the edge automatically | Quick drafts and social posts | Premium ecommerce, print, and fine details |
Simple rule: if the edge is sharp and solid, use a clipping path. If the edge is soft or wispy, use image masking. For complex products, editors often combine both.
Types of Clipping Path
Not every image takes the same effort. Editing companies usually group clipping path work by how complex the outline is.
Basic Clipping Path
For simple shapes with few curves, like a book, a phone, a box, or a ball. These are quick to trace and very affordable.
Simple Clipping Path
For objects with a few more curves or a small hole, such as a mug with a handle, a ring, or a basic pair of earrings.
Compound Clipping Path
For items with several holes or parts, like a bicycle, a chair with open slats, or a bracelet. The editor draws extra inner paths to remove the background inside the gaps.
Complex Clipping Path
For products with many curves, cutouts, and fine details, such as jewelry sets, lace items, or detailed shoes. These need more anchor points and more time.
Super Complex Clipping Path
For very detailed images like a tree with branches, a fence, a group of products, or intricate machinery. This level takes skilled hands and patience.
Multi Clipping Path
Instead of one outline, the editor draws separate paths for different parts of the object. For example, a jacket might have one path for the sleeves, one for the zipper, and one for the collar. This lets you change the color of each part on its own, which is very useful for showing product variants without a new photo shoot.
Where Is a Clipping Path Used? Real Examples by Industry
Ecommerce and Online Stores
Marketplaces have strict image rules. Amazon, for example, asks for the main product image on a pure white background (RGB 255, 255, 255), with the product filling about 85 percent of the frame. A clean clipping path is the most reliable way to meet those rules on Amazon, eBay, Etsy, Walmart, and Shopify stores.
Fashion and Apparel
Clothing brands use clipping paths to cut out garments, remove hangers and models, and prepare images for ghost mannequin effects. Multi clipping paths also help show the same item in different colors.
Jewelry
Rings, necklaces, and watches have tiny curves and shiny surfaces. A precise path keeps every edge sharp, so the piece looks premium and trustworthy.
Real Estate
Agents and photographers use clipping paths to replace a dull gray sky with a bright blue one, remove unwanted objects, and highlight a property’s best features.
Print, Packaging, and Publishing
Catalogs, magazines, flyers, and packaging often need cutouts that wrap around text or sit on colored designs. Vector paths keep everything sharp at any print size.
Advertising and Marketing
Agencies combine cutout products with new scenes, text, and effects to build banners, social ads, and campaign visuals.
Photographers
Studio and product photographers save hours by sending cutout work to an editing team, so they can focus on shooting and clients.
How Professionals Create a Clipping Path in Photoshop
If you want to try it yourself, here is the basic workflow most editors follow.
- Open the image in Photoshop and zoom in to about 200 to 300 percent so you can see the edges clearly.
- Select the Pen Tool (shortcut P) and set the mode to Path in the top bar.
- Click to add anchor points along the edge. Click and drag to create curves.
- Place the path slightly inside the edge, by about one pixel. This avoids a thin line of old background around the subject.
- Close the path by clicking on the first anchor point.
- Save the path in the Paths panel so it stays in the file.
- Make a selection by pressing Ctrl + Enter (Cmd + Enter on Mac).
- Add a layer mask or delete the background, then place your new backdrop.
- Check the edges at high zoom on both a white and a dark background.
- Export as PSD or TIFF to keep the path, or PNG for a transparent background.
Pro tip: Use as few anchor points as possible. Fewer points create smoother curves and a more natural edge.
Hand-Drawn Clipping Path vs AI Background Removal
AI tools have become fast and popular. They are handy for quick social posts or draft mockups. But for professional product images, a hand-drawn path still wins in most cases.
Where AI falls short:
- It can cut off thin parts like straps, handles, or chains
- It often leaves soft halos or leftover background pixels
- It struggles with white products on white backgrounds
- It may confuse shadows or reflections with the product
- Results change from image to image, which hurts consistency
Where a manual clipping path shines:
- Pixel-accurate edges every time
- Consistent results across large batches
- Reusable paths for future edits
- Better handling of tricky products like glass, jewelry, and gadgets
Many modern studios now use a mix. AI handles the rough first pass, and a skilled editor refines the edges by hand. This hybrid approach gives speed without losing quality.
Common Clipping Path Mistakes to Avoid
Even small errors can make a product look unprofessional. Watch out for these:
- Too many anchor points: This creates bumpy, jagged edges.
- Path drawn outside the edge: A thin ring of the old background stays visible.
- Cutting into the product: Parts of the item look chopped or flat.
- Missing inner gaps: Background still shows through handles, holes, or straps.
- Using a path on hair or fur: Soft edges need image masking instead.
- Ignoring shadows: A product floating with no shadow can look fake. Adding a natural or drop shadow helps.
- Wrong file format: Saving as JPEG removes transparency. Use PNG, PSD, or TIFF when you need it.
How to Choose a Clipping Path Service Provider
If you have hundreds of images each week, outsourcing often makes more sense than doing it in-house. Here is a short checklist to help you pick the right partner.
- Hand-drawn work: Ask if they use the Pen Tool by hand or rely only on automatic tools.
- Portfolio: Look at before and after samples in your product category.
- Free test: A good company will edit a few sample images so you can judge the quality.
- Turnaround time: Check if they offer standard and rush delivery.
- Bulk capacity: Make sure they can handle large batches without dropping quality.
- Quality control: Ask how they check each image before delivery.
- Revisions: Clear revision policies protect you if something is not right.
- Data security: Your unreleased products and photos should stay private.
- Full service range: One partner for cutouts, retouching, shadows, and color work saves time and keeps results consistent.
Clipping Area: Your Premium Post-Production Partner
Clipping Area is a premium post-production and photo retouching agency that provides complete image editing solutions for brands, photographers, and agencies around the world. Founded in 2014 and based in Dhaka, Bangladesh, our team has spent more than a decade helping businesses turn ordinary photos into clean, sales-ready visuals.
Every clipping path we deliver is drawn by hand by trained editors, then checked by our quality control team before it reaches you. That is how we keep edges sharp, results consistent, and your brand looking its best across every channel.
Our Image Editing Services
- Clipping Path: Hand-drawn Pen Tool paths, from basic to super complex and multi clipping path work.
- Background Removal: Pure white, transparent, or custom backgrounds that meet Amazon, Shopify, eBay, and Etsy rules.
- Image Masking: Clean cutouts for hair, fur, lace, glass, and other soft or see-through edges.
- Ghost Mannequin: Invisible mannequin and neck joint effects that give apparel a natural 3D shape.
- Ecommerce Image Editing: Full product image prep, including cropping, resizing, alignment, and marketplace compliance.
- Real Estate Photo Editing: Sky replacement, HDR blending, object removal, and virtual twilight for property listings.
- Jewelry Retouching: Dust removal, metal polishing, stone enhancement, and sparkle for rings, necklaces, and watches.
- Product Retouching: Scratch and dust removal, surface cleanup, and detail enhancement for any product.
- Color Correction: Accurate, true-to-life colors and color variants so returns go down and trust goes up.
- Shadow Creation: Natural, drop, and reflection shadows that make products look grounded and real.
- Photo Retouching: Skin retouching, fashion and model retouching, and high-end beauty edits.
- Video Editing, 3D Rendering, and AI Creative Services: Extra post-production support for modern marketing needs.
Who We Work With
We partner with ecommerce brands, fashion labels, product and studio photographers, real estate agencies, and marketing agencies across the US, UK, Canada, Australia, Europe, and beyond.
Why Brands Choose Clipping Area
- Over ten years of post-production experience
- 100 percent hand-drawn clipping paths
- Strict multi-step quality control
- Fast turnaround and bulk order support
- One partner for every image editing need
- Secure, private handling of your files
Ready to see the difference? Visit clippingarea.com and send us a few sample images to get started.
Frequently Asked Questions
What is a clipping path in photo editing?
A clipping path is a vector outline drawn around an object with the Pen Tool. It separates the subject from its background so you can remove, replace, or edit parts of the image without affecting the rest.
Why is a clipping path important for image manipulation?
It gives you clean, accurate edges and full control over the subject. That makes background changes, color edits, shadows, and compositing look natural instead of fake.
What is the difference between a clipping path and image masking?
A clipping path uses a vector outline and works best on hard, solid edges. Image masking is pixel based and works best on soft edges like hair, fur, and fabric.
Is a clipping path better than AI background removal?
For professional ecommerce and print work, yes in most cases. AI is fast but often misses fine details and leaves rough edges. A hand-drawn path is more precise and consistent.
Which file formats keep a clipping path?
PSD, TIFF, EPS, and JPEG files can store a clipping path. PNG does not store the path itself, but it is the best choice when you need a transparent background.
What is a multi clipping path used for?
A multi clipping path uses separate outlines for different parts of an object. It lets you change the color or detail of each part on its own, which is great for showing product variants.
How long does it take to create a clipping path?
A basic path can take a few minutes. A complex or super complex path, like detailed jewelry or a bicycle, can take much longer. Professional services handle large batches quickly with trained teams.
Can a clipping path help my products sell more?
Clean, consistent product photos build trust and make listings look professional. Many marketplaces also require white backgrounds, so a good clipping path helps your images get approved and stand out.
Final Thoughts
A clipping path may look like a small step, but it shapes everything that comes after it. Clean edges make your edits believable, your catalog consistent, and your brand more trustworthy. Whether you need a simple white background or a full set of color variants, using a clipping path for better image manipulation is one of the smartest moves you can make for your visuals.
If you would rather spend your time growing your business than tracing edges, let a trusted team handle it. Clipping Area delivers hand-drawn clipping paths and complete post-production services that help your images look sharp, clean, and ready to sell.