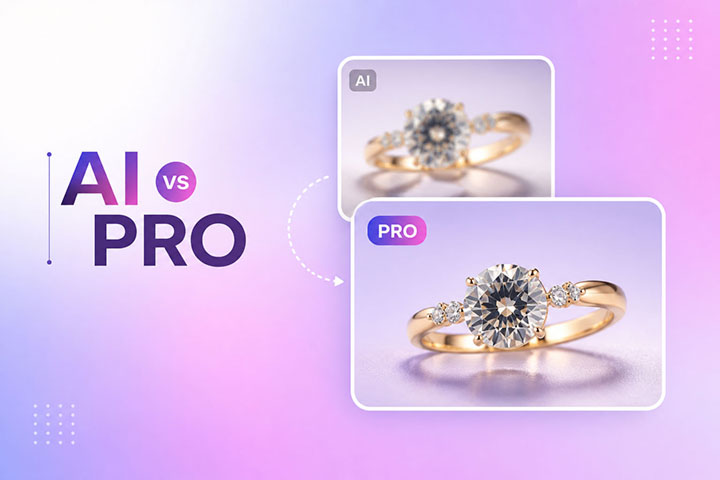
You spent $2,500 on a professional jewelry photoshoot. The diamonds sparkled, the gold gleamed, every photo looked perfect on your camera screen. Then you ran the images through Remove.bg or Photoshop’s AI “Remove Background” feature, and now your $5,000 engagement ring looks like a melted mess.
The diamond prongs are chewed off. The reflective gold has missing chunks. The delicate negative space inside the necklace chains is still filled with gray studio paper. Worse, when you zoom in, every edge looks jagged, blurry, or surrounded by a strange halo.
If this sounds painfully familiar, you are not alone. Industry data shows that reflective and transparent products cause the majority of background removal failures, even though they make up a small fraction of total ecommerce listings. Jewelry sits at the very top of that failure pile.
In this guide, we will break down exactly why AI tools cannot handle jewelry photos in 2026, show you the 3 manual techniques professional retouchers use to fix these problems, and help you decide when to DIY vs when to outsource.
The Real Cost of Bad Jewelry Edits
Before we get technical, it helps to understand why this actually matters for your bottom line.
Jewelry buyers behave differently than other online shoppers. When someone considers a $300 ring or a $2,000 necklace, they zoom in. A lot. They scrutinize every prong, every facet, every reflection. If they see a jagged edge, a fake-looking halo, or a gemstone that looks like cloudy plastic, trust evaporates instantly. They close the tab.
Larger retailers have entire QA teams dedicated to flagging “AI artifacts” before products go live (ghostly halos, jagged edges, unnaturally flat-looking products). Each flagged image costs roughly $15 in retoucher labor to fix manually. For a small jewelry brand processing 50 SKUs per month, that adds up to $750 in hidden cleanup costs you may not even realize you are absorbing.
The bigger cost? Lost sales. Product image quality is one of the strongest predictors of conversion for online shoppers, and jewelry is the category most sensitive to it.
The 3 Technical Reasons AI Fails on Jewelry
To fix the problem, you need to understand the root cause. Modern AI background removal tools (Remove.bg, Photoshop’s Select Subject, Adobe Firefly Generative Fill, PixFocal, and others) all rely on similar machine learning models trained to detect object edges through contrast, color gradients, and texture patterns.
That works beautifully for a person in a blue shirt against a gray wall. It fails catastrophically on jewelry for three specific reasons.
1. Specular Highlights on Polished Metal
Polished gold, silver, and platinum behave like mirrors. They reflect the exact color and tone of whatever surrounds them, including your studio backdrop. When the AI scans the image looking for “what is the product” vs “what is the background,” it sees parts of the metal that look identical to the background pixels. So it erases them.
The result? Missing chunks of metal along the band, blown-out highlights that fade into the white background, and rings that look like they have bites taken out of them.
2. Transparency and Refraction in Gemstones
Diamonds, sapphires, emeralds, and any translucent stone do not have solid edges the way a coffee mug does. Light passes through them, bends (refracts), and bounces internally to create the sparkle that defines the gem. AI models cannot distinguish between the inside of a diamond and the background visible through it. The algorithm either treats the whole stone as background and erases parts of it, or treats it as solid and turns it into opaque plastic.
Generative Fill makes this even worse. When you ask it to clean up a stone, it tries to “guess” what should be there based on its training data, which results in hallucinated facets that do not match the physical product. Your real diamond gets replaced with a fake-looking stand-in that no buyer will trust.
3. Negative Space Inside Chains and Filigree
Look at a Cuban link bracelet. There are dozens of tiny gaps inside the links where you should see the new background showing through. AI models struggle to identify these as “background to remove” because they are surrounded by the product. So they leave the original studio paper color trapped inside every link.
The same problem hits filigree settings, openwork pendants, and any complex chain. After AI processing, you place the jewelry on a clean white background, but the gaps inside still show gray. The illusion of transparency is broken, and the photo looks amateur.
How to Tell If Your AI Edit Failed (Quick Checklist)
Before you publish any jewelry image, zoom to 200% and check for these 10 problems:
- Jagged or pixelated edges along smooth metal bands
- Missing or partial diamond prongs
- Background pixels still visible inside chain links
- Soft, blurry halos around the entire piece
- Diamonds that look opaque, white, or cloudy
- Color bleed where the gem meets the metal
- Gemstone facets that look melted or wavy
- Mismatched lighting between the gem and the setting
- Lost detail in filigree or engraving
- Faint outlines of the original background color around polished surfaces
If you spot any of these, the AI edit failed. Time to fix it manually.
The 3 Manual Fixes Pros Use
Here are the 3 techniques professional retouchers rely on, ranked from easiest (DIY-friendly) to most advanced (industry standard).
Method 1: Hybrid AI + Pen Tool Refinement (Beginner Friendly)
This is the fastest fix if you already have basic Photoshop skills. You let the AI do the bulk of the work, then manually clean up its mistakes.
Steps:
- Open your jewelry image in Photoshop (v25.0 or newer).
- Click Select Subject to generate a rough AI mask.
- Convert the selection to a Layer Mask.
- Select the Pen Tool (P) and set it to Path mode.
- Manually draw a precise vector path around the failed areas (jagged edges, missing prongs, gray pixels inside chains).
- Right-click the path and choose Make Selection. Set feather to 0.5 px. This gives natural anti-aliasing without softening the edge too much.
- Paint with white on the Layer Mask to restore clipped prongs, or paint with black to remove background trapped inside chains.
- Open Select and Mask, check Decontaminate Colors, and output to a new layer with mask. This forces Photoshop to replace edge pixels containing background spill with colors sampled from the jewelry itself.
Time per image: 5 to 10 minutes for a simple ring, 15 to 25 minutes for a complex chain.
Skill needed: Intermediate Photoshop, basic comfort with the Pen Tool.
Method 2: Channel Masking for Transparent Gemstones (Intermediate)
For diamonds, glass, and any translucent stone, the Pen Tool alone is not enough. A hard vector path will cut out the stone, but the result looks like opaque plastic. To preserve real transparency, you need channel masking.
Steps:
- Open the Channels panel (Window > Channels).
- Click through the Red, Green, and Blue channels to find the one with the highest contrast for your gemstone. The Blue channel usually works best for diamonds.
- Right-click and duplicate that channel.
- Press Ctrl+L (Cmd+L on Mac) to apply Levels. Push the blacks down and the whites up to force extreme contrast.
- Ctrl-click (Cmd-click) the duplicated channel’s thumbnail to load the gemstone’s exact luminosity as a selection.
- Combine this selection with your manual Pen Tool path for the metal setting.
- Apply as a Layer Mask.
The result preserves the actual light passing through the stone, so the diamond still looks like a diamond when placed on a new background.
Time per image: 15 to 25 minutes per gemstone.
Skill needed: Advanced Photoshop, comfort with channels and luminosity selections.
Method 3: Full Manual Clipping Path (Industry Standard)
This is the pure approach used by every high-end retouching house and luxury jewelry brand. No AI involvement at all. A retoucher selects the Pen Tool, sets it to Path mode, and manually plots a vector path around every contour of the piece, including each link in a chain, each prong, and each facet edge.
For complex pieces, this can mean drawing 20 to 50 separate sub-paths in a single image (one for the outer edge, one for each negative space, one for each facet group, and so on).
The result is mathematically perfect. Smooth Bezier curves on metal bands. Clean edges around every prong. Real transparency where chains have gaps. Zero AI artifacts. Period. This is why luxury jewelry brands still pay $25 to $50 per image for hero shots, accepting the cost as insurance against the conversion damage that visible AI failures cause.
Time per image: 25 to 90 minutes depending on complexity.
Skill needed: Professional. Most in-house teams cannot maintain this level of quality at scale.
DIY vs Outsource: The Real Math
Here is the honest cost comparison.
Fewer than 10 jewelry images per month: DIY makes sense. Get a Photoshop subscription, watch some YouTube tutorials on the Pen Tool, and you will reach acceptable quality in 30 to 60 days of practice.
10 to 50 images per month: The math gets ugly fast. At even 15 minutes per image with Method 1, you are spending 12 to 13 hours per month on retouching alone. At a conservative $25/hour value for your time, that is $300+ per month in opportunity cost (and the quality still will not match a professional retoucher).
50+ images per month: Outsourcing is almost always cheaper. Professional clipping path services typically charge $0.50 to $3 per image depending on complexity, with 12 to 24 hour turnaround. For 50 jewelry images, you are looking at $25 to $150 total, vs 15 to 30+ hours of your time.
The break-even point for most jewelry sellers sits around 15 to 20 images per month. Above that, outsourcing wins on every metric.
What We See Most Often With Jewelry Clients
In our work with jewelry sellers (Etsy shops, fine jewelry brands, and product photographers), the same patterns show up repeatedly:
- AI tools work fine for the first 3 to 6 months, until conversion rates start mysteriously dropping. Sellers rarely connect the drop to image quality because the photos still “look fine” at thumbnail size.
- Once they switch to manual editing, conversion rates typically recover within 4 to 8 weeks. Average review ratings often climb too, because customers stop receiving products that look different from the listing photos.
- The hidden cost of AI editing is rework. Sellers spend hours fighting with masks, redoing edits, or dealing with customer complaints about misleading product photos. None of this shows up on an invoice, but it eats real time.
The takeaway: AI is a great starting point for casual social media photos. For jewelry product photography, it is almost always the wrong tool.
When AI Is Actually Fine for Jewelry
To be fair, AI background removal does work acceptably for some jewelry photos:
- Costume jewelry with matte finishes (no reflections to confuse the AI)
- Jewelry photographed against high-contrast backgrounds (black velvet, deep colors)
- Solid metal pieces with no gemstones (simple bangles, plain hoops)
- Social media posts where viewers will not zoom past 100%
For everything else (engagement rings, fine jewelry, anything with stones, anything that will appear on a product detail page), manual editing is non-negotiable if you care about conversions.
Frequently Asked Questions
Can I use Remove.bg for jewelry if I retouch the result in Photoshop afterward?
Yes, Method 1 above is exactly this approach. It saves time vs full manual editing, but you still need solid Pen Tool skills to fix the AI’s mistakes. Plan for 5 to 15 minutes per image.
Why does Photoshop’s Generative Fill make my diamonds look melted?
Adobe Firefly is trained on broad image data and does not understand the precise geometry of gemstone facets. It tries to “guess” the texture and ends up averaging pixels, which destroys micro-contrast and creates a cloudy, plastic appearance.
What is the difference between clipping path and background removal?
Background removal is the goal (isolating the product from its background). Clipping path is one method to achieve it (drawing a vector path with the Pen Tool). Manual clipping path is more precise than AI-based background removal because it produces mathematically smooth curves rather than pixel-based guesses.
How long does manual jewelry editing actually take?
Simple rings: 5 to 15 minutes. Complex chains: 25 to 60 minutes. Jewelry with multiple gemstones and intricate settings: 60 to 90 minutes per image for full retouching.
How much should I pay for outsourced jewelry retouching in 2026?
Fair market rates are $0.50 to $1.50 per image for basic clipping path, $2 to $5 per image for full retouching (clipping + color correction + dust and scratch removal). Anything above $5 per image should include high-end retouching like gemstone enhancement, metal polishing, or shadow creation.
Can I use this same approach for watches and luxury accessories?
Yes. The same 3 problems (specular highlights, transparency, negative space) apply to watches, sunglasses, glassware, perfume bottles, and any reflective or translucent product. The fixes work identically.
Will AI background removal ever be good enough for jewelry?
Probably not in the next 2 to 3 years. The fundamental problem is that AI models lack the geometric awareness needed to understand light refraction in gemstones and reflection physics on polished metal. Until models are specifically trained on these properties (and validated by jewelry retouching experts), manual editing will remain the standard for high-end product imagery.
Stop Fighting AI. Start Selling.
If you are a jewelry photographer, Etsy seller, or fine jewelry brand losing hours every week trying to clean up AI failures, you have two choices.
You can spend the next 6 months mastering the Pen Tool, channel masking, and frequency separation. That is a real path, and we genuinely encourage anyone with the time and interest to learn it.
Or you can outsource to a team that already does this 1,000+ times per week.
At ClippingArea, we specialize in manual clipping path and high-end retouching for jewelry brands and product photographers worldwide. Every image is hand-edited (no AI shortcuts), with 12 to 24 hour turnaround and unlimited free revisions until you are 100% satisfied.
Try us with 3 free sample images. Send us your hardest jewelry photos, the ones AI tools always ruin. We will edit them with full manual clipping path, send them back within 24 hours, and you decide if the quality is worth it. No credit card required. No commitment.