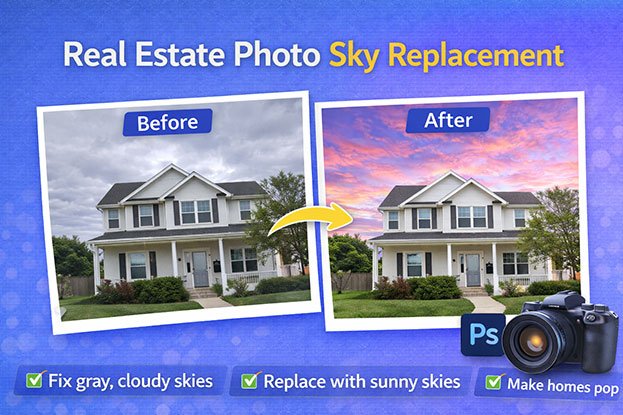
A gray sky can quietly drag down an otherwise strong exterior photo. The house is sharp, the lawn is trimmed, and the exposure is right, yet the whole frame feels flat. The sky usually takes up a large part of an exterior shot, so it sets the mood for everything below it. This is where real estate photo sky replacement comes in. It is a post-production technique that swaps a dull, overcast, or washed-out sky for a natural-looking one. Done well, it can make an exterior image feel more balanced and reduce the distraction a blank sky creates. Done poorly, it looks fake right away. The difference comes down to masking, lighting, and restraint, and that is what this article explains.
What Is Real Estate Photo Sky Replacement?
Real estate sky replacement is a post-production technique that removes an existing sky from a property photograph and replaces it with another sky while blending the new background with the property’s edges, lighting, and perspective.
In simple terms, the editor does three things:
- Separates the sky from the property. This is called masking. The editor builds a selection that isolates the sky from the roof, trees, fences, and everything else.
- Adds a replacement sky. A suitable sky image is placed behind the property.
- Blends the new sky into the scene. Color, brightness, perspective, and edges are adjusted so the sky and the house look like they were captured together.
A practical example: A photographer shoots a two-story home on an overcast morning. The house is well exposed and the landscaping looks good, but the sky is a flat, pale gray that pulls attention away from the property. In post-production, the editor masks the sky, adds a soft, partly cloudy sky, matches its brightness to the scene, and cleans up the edges around the roofline and trees. The house, the yard, and the surrounding details stay exactly as they were. Only the background changes.
Matching matters because the human eye is very good at spotting things that do not belong together. A warm evening sky over a house lit by flat midday light will feel wrong, even if the viewer cannot explain why.
Why Do Real Estate Photos Have Gray or Dull Skies?
Most dull skies come from a mix of weather, light, and camera limits. Here are the main causes.
Overcast Weather
Thick cloud cover spreads sunlight evenly across the sky. The result is a sky with little color or texture, often just a smooth sheet of gray. Photographers cannot always reschedule, especially when a listing has a deadline.
Poor Lighting Conditions
Low-contrast days make everything look flatter. The sky and the building can blend into similar tones, so the property does not separate well from its background.
Camera Exposure
Exterior shots are usually exposed for the property, not the sky. When the camera is set to show the house clearly, the much brighter sky can turn pale or almost white.
Bright Highlights
Cameras have a limited range between the darkest and brightest details they can record. On bright but hazy days, the sky can exceed that range, and cloud detail is lost. Even HDR bracketing does not always recover a sky that was featureless to begin with.
Time of Day
Midday sun often creates a harsh, washed-out sky near the horizon. Early morning or late afternoon light tends to give richer color, but shoot times are not always flexible.
Seasonal Conditions
Winter months in many regions bring long stretches of gray weather. Haze, smoke, or humidity in other seasons can also make the sky look dull and colorless.
When Does a Real Estate Photo Need Sky Replacement?
Sky replacement makes sense when the sky actively hurts the image. Common cases include:
- The sky is completely gray or heavily overcast
- The sky is blank, white, or washed out
- The sky distracts from the property
- The original sky has no detail left to recover
- The property looks visually flat because of the weather
- The exterior image needs a more balanced background to match the rest of the listing
When Sky Replacement May Not Be Necessary
Replacing the sky is not always the right call. Skip it or think twice when:
- The original sky already looks natural. A light cloud cover can be perfectly fine.
- The image is intentionally moody. Some architectural or luxury shoots use soft, gray light on purpose.
- The property was photographed at dusk. Twilight images already have their own sky and lighting balance.
- The weather is part of the story. A snowy cabin listing may look strange under a summer-blue sky.
- The change would mislead buyers. If replacing the sky hides something relevant or changes how the property really feels, leave it alone.
Types of Sky Replacement
Not every property needs the same sky. The best choice depends on the scene.
Blue Sky Replacement
A clear or mostly clear blue sky can work for bright, sunny exteriors where the property already has clear shadows and strong light. It suits many suburban homes and commercial buildings.
Partly Cloudy Sky
A soft cloud pattern often looks more natural than a perfectly clean blue sky. Clouds add depth and help the sky feel real, especially when the original photo was taken under diffused light.
Sunset or Golden-Hour Sky
A warm sunset sky can be appropriate for twilight shoots or images where the property lighting is already warm and low. It becomes misleading when placed over a scene clearly lit by midday sun, or when it suggests a view or setting that does not match reality.
Dramatic Sky
Heavy, high-contrast clouds can look striking, but they often pull focus away from the property. For listings, dramatic skies should be used carefully and only when the lighting in the scene supports them.
Neutral Natural Sky
Sometimes the best replacement is a subtle one: a light blue sky with faint, thin clouds. It simply removes the dull gray without drawing attention to itself. In many cases, subtle beats dramatic because viewers accept it without question.
What Makes a Real Estate Sky Replacement Look Realistic?
A realistic sky replacement is one that nobody notices. That takes much more than pasting a blue sky behind a house.
Matching Lighting
The new sky must make sense with the light falling on the property. A bright sunny sky over a house with no shadows feels off.
Matching Color Temperature
The sky should not be very warm while the building looks cool, or the other way around, unless the scene clearly supports it.
Matching Brightness
Real skies are usually brighter than the ground. A sky that is darker or much more saturated than the rest of the image looks pasted in.
Matching Cloud Detail
Cloud size and density should fit the camera angle and lens. Huge, close clouds over a wide-angle shot often look out of scale.
Correct Horizon Placement
The sky should meet the property naturally. Skies usually get lighter and hazier near the horizon, and the replacement should reflect that.
Accurate Perspective
A sky shot looking straight up will not fit a photo taken at eye level. The replacement should match the camera’s viewpoint.
Natural Blending
Edges should never look cut out. Soft transitions around rooflines and foliage are essential.
Consistent Shadows
If the replacement suggests strong sunlight, the property should have matching shadows. If the house was shot in soft light, a softer sky usually fits better.
Common Sky Replacement Problems (and How Editors Fix Them)
| Problem | What It Looks Like | How Professionals Fix It |
|---|---|---|
| Hard edges | Roofline looks cut out with scissors | Refine mask edges and feather transitions |
| Visible halos | Bright or dark outline around the building | Adjust edge contrast and decontaminate edge colors |
| Mismatched brightness | Sky too dark or too bright for the scene | Adjust sky exposure to sit naturally above the property |
| Unrealistic cloud scale | Clouds look too large or too close | Choose a sky shot with a similar lens and angle |
| Wrong color temperature | Warm sky over a cool-toned house | Color-match the sky or the scene |
| Incorrect lighting direction | Sun glow on the wrong side | Pick or flip a sky that matches the shadows |
| Too dramatic | Sky dominates the image | Use a calmer, neutral sky |
| Oversaturated blue | Sky looks artificial | Reduce saturation and add natural gradation |
| Repeated sky patterns | Same sky across every listing | Use varied sky sources |
| Sky covering roof or tree details | Chimneys, vents, or leaves disappear | Rebuild the mask with manual detail work |
| Missing gaps between branches | Old gray sky visible through the tree | Mask small openings individually |
| Unrealistic reflections | Windows still show a gray sky | Review and adjust reflective surfaces |
| Inconsistent shadows | Sunny sky, no shadows on the property | Choose a softer sky or keep the look balanced |
Sky Replacement Around Trees and Complex Edges
Trees are where most sky replacements succeed or fail.
A rooftop is a clean, solid edge. A tree is not. It has thousands of small branches, leaves, and gaps where the sky shows through. Fences, poles, antennas, gutters, and power lines add even more fine detail.
Here is what careful edge work involves:
- Edge refinement. Softening and adjusting the mask so the transition between sky and object looks natural.
- Detailed masking. Selecting fine elements like chimneys, satellite dishes, and ornamental roof trim so they are not erased.
- Semi-transparent branches. Thin outer branches are partly see-through. The mask should let a little of the new sky show through them, just as in real life.
- Small gaps. Every opening in the foliage needs the new sky. One missed gap of gray is enough to reveal the edit.
- Hair-like foliage. Pine needles, palm fronds, and wispy leaves need edge-aware selection, similar to masking hair in portrait retouching.
- Power lines. Thin wires are easy to erase by accident or leave with a gray outline. They should be preserved cleanly.
- Roof edges. Shingle edges, gutters, and ridge caps must stay sharp without a light or dark halo.
Automated tools handle simple edges quite well. Dense trees, bright backlit branches, and thin wires often still need manual cleanup at full size.
Sky Replacement and Property Reflections
Replacing the visible sky is sometimes only half the job. The old sky may still appear in:
- Windows and glass doors
- Parked cars
- Polished metal or glossy siding
- Swimming pools
- Ponds, lakes, or other water
If the new sky is blue and bright but every window shows a flat gray sky, the image feels inconsistent. Editors should review reflective surfaces and, where it makes sense, adjust them so they relate to the new sky. This should be done subtly. The goal is visual consistency, not creating perfect mirror images.
Sky Replacement and Lighting Direction
Every exterior photo has a light source, usually the sun. Shadows show where it is. If shadows fall to the left, the light is coming from the right.
A replacement sky should not contradict that. For example:
- A sunset glowing on the left side of the frame does not work if the house is lit from the left and the shadows fall right.
- A bright sunset sky over a building with flat, even midday light looks staged.
- A strong sunny sky over a scene with no shadows at all can feel artificial.
When the original photo was shot on an overcast day, there are often no clear shadows. In that case, a softer sky with light clouds is usually more believable than a bright, cloudless one.
Sky Replacement vs Sky Enhancement
Sky enhancement keeps the original sky and improves it. Sky replacement removes the original sky and puts in a new one.
| Sky Enhancement | Sky Replacement | |
|---|---|---|
| Original sky | Kept | Removed |
| Typical adjustments | Exposure, contrast, color, highlights, clarity | Masking, compositing, blending, color matching |
| Best for | Skies with some detail and color | Blank, gray, or washed-out skies |
| Risk of looking fake | Low | Higher if done poorly |
| Editing time | Shorter | Longer, especially with trees |
If the sky has usable detail, enhancement is often the better first choice. If the sky is a solid gray or white block, replacement is usually the only practical fix.
Professional Real Estate Sky Replacement Workflow
Here is how a careful editor approaches each image:
- Review the original image. Check exposure, weather, and whether replacement is appropriate at all.
- Identify the sky area. Note how much sky is visible and where it meets the property.
- Check the property edges. Look for trees, wires, chimneys, and other difficult areas.
- Create or refine the mask. Start with an automatic selection if helpful, then refine by hand.
- Select a suitable replacement sky. Match weather, time of day, and lighting.
- Match perspective. Make sure the sky fits the camera angle and lens.
- Match brightness. Keep the sky naturally brighter than the ground, but not blown out.
- Match color temperature. Warm or cool the sky so it fits the scene.
- Blend the sky with the scene. Add natural gradation toward the horizon.
- Refine trees, rooflines, and edges. Remove halos and fill small gaps.
- Check reflections. Review windows, pools, and cars.
- Check shadows and lighting. Confirm the sky and light direction agree.
- Review the complete image. Look at the photo as a whole, not just the sky.
- Compare with the original. Make sure the property itself has not changed.
- Perform final quality control. Inspect at 100% zoom and check consistency across the full listing set.
Skipping any of these steps is usually how fake-looking results slip through.
How to Choose the Right Sky
The right sky supports the property. It should never become the main subject. Editors should consider:
- Weather: Does the sky fit how the ground looks (wet pavement, snow, dry lawns)?
- Season: Bare trees under a bright summer sky can feel odd.
- Time of day: Shadow length and warmth should match.
- Lighting direction: The brightest part of the sky should sit on the side the light comes from.
- Cloud density: Light clouds for soft light, clearer skies for strong sun.
- Color: Natural blues, not neon.
- Perspective: Similar angle and lens as the original.
- Property style: A modern glass home and a rustic farmhouse may call for different moods.
- Image exposure: A bright, airy exterior needs a light sky, not a dark, heavy one.
Should Every Real Estate Photo Have a Blue Sky?
No. Not every real estate photo needs a bright blue sky.
- Some properties look better with subtle, soft clouds.
- Some images work well with natural overcast conditions, especially when the light is even and flattering.
- Luxury and architectural listings often use a restrained, calm look.
- Sunset skies only make sense when the lighting in the image supports them.
- Realistic presentation should always come first.
A listing where every exterior has the same saturated blue sky can actually look less trustworthy, not more.
Ethical and Accurate Sky Replacement
Sky replacement should improve presentation without creating a false impression of the property.
Good practice includes:
- Avoiding extreme weather changes that misrepresent the location or season.
- Avoiding unrealistic lighting that makes the property look like something it is not.
- Not hiding important conditions. A sky edit should never be used to cover up nearby structures, damage, or features buyers would want to know about.
- Keeping the property itself unchanged. The house, lot, and surroundings stay accurate.
- Maintaining visual context. The image should still represent the real place.
Enhancement makes a truthful photo look its best. Misrepresentation changes what a buyer understands about the property. Replacing a dull sky usually falls on the enhancement side, as long as everything else stays honest.
Real estate professionals should follow the listing standards and disclosure requirements that apply to their market.
Before and After: What Should Change?
Before:
- Gray, flat sky
- Low visual separation between the house and the background
- Washed-out upper portion of the frame
- Overall dull impression
After:
- Natural-looking sky
- Balanced contrast
- Clear separation between the roofline and the sky
- A more polished overall presentation
What should not change: the house, its materials, its condition, the lot, or the neighborhood. The goal is a better version of the same photo, not a different property.
DIY vs Professional Sky Replacement
DIY Sky Replacement
Tools like Photoshop’s built-in Sky Replacement feature make basic swaps fast. Lightroom can select and adjust the sky with masking, but it does not replace it in the same way, so it is better suited to enhancement.
DIY can work well when:
- You edit a small number of photos
- The properties have simple rooflines and few trees
- You have time to learn masking and blending
The challenges show up with dense foliage, thin wires, halos, reflections, and keeping a consistent look across dozens of listings.
Professional Editing
Outsourcing tends to make more sense when:
- You shoot many properties each week
- Exteriors include complex trees and edges
- You need consistent results across every listing
- You want reflections, color correction, and other fixes handled in one pass
- Your time is better spent shooting or selling
Professional editors bring experienced masking, natural blending, batch processing, and quality control. That said, professional editing is not always necessary. For occasional, simple exteriors, a well-trained DIY workflow can be enough.
AI Sky Replacement in 2026
AI tools now play a real role in real estate photography editing. Common features include:
- Automatic sky detection
- One-click AI sky replacement
- Automated masking
- Batch editing across full shoots
- Edge detection around buildings
- AI-assisted blending and color matching
These tools save time, especially on simple exteriors with clean rooflines.
Where AI still struggles:
- Complex trees and thin branches
- Power lines and fine wires
- Reflections in windows and pools
- Unusual architecture or glass-heavy buildings
- Lighting that does not match the chosen sky
- Sky choices that are too bright or dramatic for the scene
AI-assisted sky replacement uses automation for the first pass, then a human editor reviews and refines it. Fully automated sky replacement delivers whatever the software produces with no human check.
AI is not always better or worse than manual editing. For professional real estate images, though, human review is often what catches the halos, missed gaps, and lighting mismatches that automation leaves behind.
How Much Does Real Estate Sky Replacement Cost?
Costs vary by provider, image complexity, volume, turnaround, and additional services. There is no single standard rate. The main factors are:
- Number of images: Larger volumes often lower the per-image cost.
- Masking complexity: A simple roofline takes less time than a wooded lot.
- Trees and foliage: Dense branches require detailed manual work.
- Property size: Large estates or commercial buildings may have more complex edges.
- Image quality: Poorly exposed files may need extra correction.
- Reflections: Windows, pools, and water add editing time.
- Additional retouching: Color correction, object removal, or HDR blending.
- Turnaround time: Rush delivery usually costs more.
- Quality-control requirements: Strict brand or listing standards may require extra review.
Common pricing models:
- Per image
- Per project or per property
- Bulk packages
- Monthly editing arrangements for regular volume
The most reliable way to know your cost is to request a quote based on your actual images.
How to Choose a Real Estate Photo Editing Company
Use this checklist when comparing providers:
- Real estate editing experience: Do they specialize in property images?
- Sky replacement quality: Do their results look natural at full size?
- Masking accuracy: Check tree edges, rooflines, and wires in their samples.
- Before-and-after samples: Ask to see real examples, not just finished images.
- Natural-looking results: Avoid providers whose skies all look the same.
- Consistency: Can they match a look across an entire listing?
- Turnaround: Does it fit your listing schedule?
- Revisions: Is there a clear revision policy?
- Communication: Are they easy to reach and responsive?
- File formats: Can they handle RAW, JPEG, and bracketed files?
- Delivery system: Is file transfer simple and secure?
- Quality control: Do they review each image before delivery?
- Bulk capability: Can they scale when your volume grows?
- Sample editing: Will they edit a few test images first?
Start with a small sample batch before committing to a larger project. It is the fastest way to judge quality on your own photos.
Real Estate Photo Sky Replacement With Clipping Area
Clipping Area is a Post-Production Photo Retouching Agency. We support real estate photographers, agents, agencies, property marketers, and rental businesses with editing workflows built around realistic, consistent results.
Our real estate photo editing services cover the full post-production process, including:
- Real Estate Sky Replacement
- HDR Real Estate Photo Editing
- Color Correction and Exposure Correction
- Perspective Correction
- Window View Enhancement
- Object Removal
- Property Photo Retouching and Image Enhancement
- Bulk Real Estate Image Editing
Our editors handle masking around trees, rooflines, and wires by hand where needed, check reflections and lighting direction, and keep every property looking like itself. You can review our real estate photo editing pricing or send us your images directly.
Get a Free Sample: Send a small batch of exterior photos, and we will edit a few so you can judge the quality on your own work.
Get a Free Quote: Share your volume and requirements, and we will recommend a practical setup.
Real Estate Sky Replacement Checklist
Save this list and run through it before delivering any exterior image:
- Does the sky match the lighting?
- Is the brightness realistic?
- Is the color temperature appropriate?
- Are clouds scaled correctly?
- Does the horizon look natural?
- Are rooflines clean?
- Are tree branches properly masked?
- Are power lines preserved?
- Are windows and reflections checked?
- Are shadows consistent?
- Is the sky too dramatic?
- Does the property remain realistic?
- Does the image match the rest of the listing?
- Has the final image been reviewed at full size?
Frequently Asked Questions
1. What is real estate photo sky replacement?
Real estate photo sky replacement is a post-production technique that removes a dull or overcast sky from a property photo and replaces it with a more natural-looking sky. The editor masks the original sky, adds a new one, and blends it so the lighting, color, and perspective match the property.
2. Why do real estate photos need sky replacement?
Real estate photos often need sky replacement because gray, overcast, or washed-out skies can make an exterior image look flat and distracting. Replacing the sky can improve visual balance, separate the property from its background, and create a more polished listing image, while the property itself stays unchanged.
3. How do you replace a gray sky in a property photo?
To replace a gray sky, select the sky with a detailed mask, add a replacement sky that fits the scene, then match its brightness, color temperature, and perspective. Refine edges around rooflines and trees, check reflections, and review the image at full size to catch halos or missed gaps.
4. Can you replace an overcast sky in real estate photography?
Yes. Overcast skies are one of the most common reasons for sky replacement. Because overcast light produces soft or no shadows, a partly cloudy or gently lit sky usually looks more believable than a bright, cloudless blue sky. The replacement should always match the lighting already in the image.
5. Should every real estate photo have a blue sky?
No. Not every property photo needs a bright blue sky. Subtle clouds, soft overcast light, or twilight skies can suit certain properties better. Luxury and architectural listings often use a restrained look. The priority should be a natural, realistic presentation rather than the same saturated blue on every image.
6. How do professionals make sky replacement look realistic?
Professionals match the sky’s lighting direction, brightness, color temperature, cloud scale, and perspective to the original photo. They refine edges around trees and rooflines, fill small gaps between branches, check reflections, and confirm shadows agree with the new sky. Final review at full size catches remaining flaws.
7. Can AI replace skies in real estate photos?
Yes. AI tools can detect skies, create masks, and swap skies quickly, often in batches. They work best on simple exteriors. Dense trees, thin wires, reflections, and lighting mismatches can still cause problems, so human review is often important for professional real estate images.
8. What is the difference between sky enhancement and sky replacement?
Sky enhancement keeps the original sky and improves it with exposure, contrast, color, and highlight adjustments. Sky replacement removes the original sky entirely and adds a new one. Enhancement suits skies with usable detail, while replacement is usually needed when the sky is blank, gray, or completely washed out.
9. How much does real estate sky replacement cost?
Real estate sky replacement cost depends on the provider, number of images, masking complexity, trees, reflections, turnaround time, and extra retouching. Common pricing models include per image, per project, bulk packages, and monthly arrangements. Requesting a quote based on your actual photos gives the most accurate estimate.
10. Can sky replacement work around trees and power lines?
Yes, but it requires careful masking. Trees have fine branches and small gaps, and power lines are thin and easy to erase. Automated tools often need manual refinement in these areas. A skilled editor preserves wires, fills every gap with the new sky, and removes halos along branch edges.
11. Should reflections be edited after replacing the sky?
Often, yes. Windows, glass doors, cars, pools, and water can still reflect the old gray sky after replacement. Reviewing these surfaces and adjusting them subtly helps the image stay visually consistent. The aim is a believable relationship between the sky and its reflections, not perfect mirror images.
12. How do I choose a professional real estate sky replacement service?
Look for real estate editing experience, natural-looking before-and-after samples, clean masking around trees and wires, consistent results, clear turnaround and revision policies, and responsive communication. Start with a small sample batch to judge quality on your own images before committing to a larger project.
Conclusion
A dull sky is one of the most common problems in exterior property photography, and one of the easiest to fix when handled carefully. Sky replacement can make an image feel more balanced and polished, but only when the new sky matches the light, color, and perspective of the original scene. The real skill is in the details: clean edges around trees and wires, consistent reflections, and restraint in sky choice. Not every photo needs a blue sky, and the property should always look like itself.
If you would rather spend your time shooting or selling than masking branches, Clipping Area can handle the post-production for you. Get a Free Sample or Get a Free Quote by sending a small batch of your exterior images.



